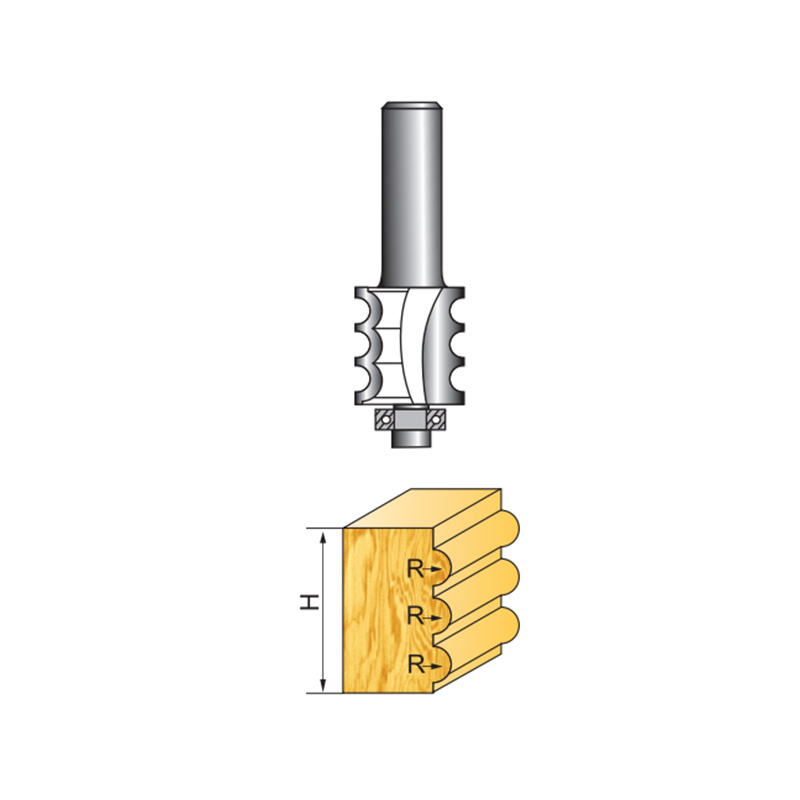
| Part No. |
Size |
D |
R |
H |
| FD39001 |
1/4×7/8 |
20.66 |
2.38 |
22.5 |
| FD39002 |
1/4×1 |
22.2 |
3.17 |
25.4 |
| FD39005 |
1/2×1-1/8 |
23.02 |
3.56 |
28.6 |
| FD39006 |
1/2×1-1/4 |
23.82 |
3.96 |
31.75 |
| FD39007 |
1/2×1-5/8 |
24.62 |
4.36 |
24.9 |
| FD39008 |
1/2×1-7/16 |
25.42 |
4.76 |
36.51 |
Key Features of a Multi-Beading Router Bit
Multiple Beads in One Pass: The defining feature of a multi-beading router bit is its ability to create multiple rounded beads or grooves in one single pass. This saves time and reduces the number of passes needed to achieve the desired decorative effect, making the process more efficient.
Variety of Bead Profiles: Multi-beading router bits come with a variety of bead profiles, ranging from smaller beads to larger, more pronounced ones. This versatility allows woodworkers to achieve different textures and finishes on their woodwork, making it ideal for both traditional and contemporary designs.
Precision and Clean Cuts: The bit is designed to provide precise, clean cuts, allowing for detailed, smooth profiles that contribute to the overall quality of the finished product. This is particularly important for projects that require a high level of craftsmanship, such as fine furniture or high-end cabinetry.
Durable Construction: Multi-beading router bits are typically made from high-quality materials like carbide or steel, ensuring longevity and consistent performance. These materials help maintain the sharpness of the bit over time, providing more cuts before needing replacement.
Ease of Use: Multi-beading router bits are user-friendly tools that can be easily attached to a router. With the right setup and proper technique, woodworkers can achieve professional-grade results with relatively minimal effort.
Applications of a Multi-Beading Router Bit
Cabinetry: One of the most common applications for a multi-beading router bit is in cabinetry. The bit can be used to create detailed bead patterns on the edges of cabinet doors, drawer fronts, and other components. This adds a touch of elegance and sophistication to kitchen, bathroom, and other types of cabinetry.
Furniture Making: Multi-beading router bits are widely used in furniture making, especially for creating decorative edges on tables, chairs, dressers, and more. The bead profiles help elevate the overall design, making furniture pieces more visually appealing.
Trim Work and Molding: In trim work and molding, multi-beading router bits are used to create decorative edges on baseboards, crown moldings, window casings, and door frames. The beaded design adds depth and texture, transforming simple moldings into intricate, eye-catching features.
Wooden Panels and Frames: For projects like wooden panels and frames, the multi-beading router bit can be used to add a repeating bead pattern along the edges. This enhances the visual interest of the piece and contributes to a more refined appearance.
Architectural Millwork: Multi-beading router bits are frequently employed in architectural millwork, which involves the creation of intricate wood components used in interior designs. These bits are perfect for adding fine details to custom-built walls, furniture, and decorative woodwork that require both functional and aesthetic value.
Benefits of Using a Multi-Beading Router Bit
Enhanced Aesthetic Appeal: The most significant benefit of using a multi-beading router bit is its ability to create visually striking, decorative designs. The repeating bead patterns add texture and elegance to woodwork, making it stand out in both residential and commercial projects.
Time Efficiency: Since multi-beading router bits can cut multiple beads in a single pass, they save time compared to traditional methods that require separate cuts for each bead. This is especially beneficial in larger projects where speed and efficiency are important.
Precision and Consistency: The router bit ensures precision and consistency in the beading process, which is essential for creating uniform designs. Consistency is crucial when working on large quantities of parts or when creating symmetrical designs.
Customization: The ability to choose different bead profiles makes multi-beading router bits a highly customizable tool. Woodworkers can adjust the design to match the specific aesthetic of a project, whether they want subtle beading or bold, prominent profiles.
Versatility: The multi-beading router bit can be used on a wide range of wood types, including softwoods, hardwoods, plywood, and MDF. This versatility makes it suitable for various applications, from fine woodworking to larger construction projects.
The Multi-Beading Router Bit is a versatile and efficient tool for creating intricate, decorative bead patterns in woodworking projects. Whether you're working on cabinetry, furniture, trim work, or architectural millwork, this bit allows you to add a unique touch to your creations. Its ability to cut multiple beads in one pass saves time while ensuring consistent, professional-quality results.
By using a multi-beading router bit, woodworkers can achieve high levels of precision and craftsmanship, making it an essential tool for anyone looking to elevate their woodworking projects with fine details and beautiful patterns.


